· Tutorials · 10 min read
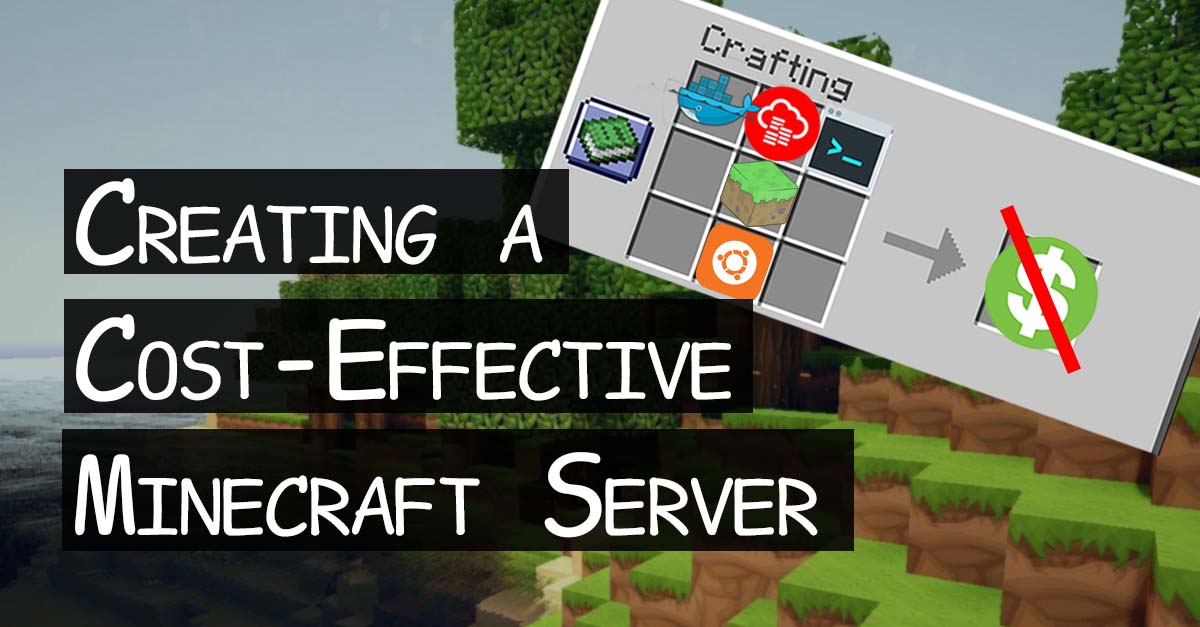
Free and Fantastic: My Zero-Cost Oracle Cloud Minecraft Server with Docker
How I crafted a zero-cost, high-performance Minecraft server on Oracle Cloud using Docker. Follow my guide for a seamless and budget-friendly gaming experience!
Playing Minecraft has become a recurring part of my year – what my friends and I affectionately call the “Minecraft Fever.” However, an issue we constantly faced was the expense of renting a server at $15 per month. We’d play for about 5-10 days, and then, as the fever waned, we found ourselves still paying for the server for an additional 2 months with no one logging on. The cycle repeated every time the Minecraft fever rekindled.
Frustrated by this costly pattern, I experimented with Amazon Lightsail, following an article on setting up a Minecraft server. While the costs averaged around $10 per month and offered better performance than typical hosting services, the expense still felt burdensome.
Determined to minimize costs, I took the plunge and created a Minecraft Server on my home network. This turned out to be a nearly cost-free solution, with the only expenditure being electricity. Fortunately, I had spare hardware, eliminating any upfront costs. Although it worked well for a while, I grappled with the unease of exposing my home network to the internet.
Discovering the Cost-Free Solution
In the latter part of the previous year, my quest for a budget-friendly Minecraft server led me to an unexpected solution – Oracle Cloud’s remarkably generous free tier. With their ARM VM instances, you’re entitled to the first 3,000 OCPU hours and 18,000 GB hours monthly, all at no cost. To put it into perspective, this translates to 4 OCPUs and 24 GB of memory! I found I had the flexibility to allocate this power to a single VM or distribute it across up to 4 VMs (1 OCPU / 8 GB each).
In an era where support for ARM processors is not widespread among programs, the beauty of the Java Programming language shines through. Java’s versatility enables its programs to run seamlessly on all processors. This aligns perfectly with the ARM VM, making the Java version of Minecraft an ideal match for this cost-free solution.
Setting Up the ARM VM
Having successfully created an Oracle Cloud account, I navigated to the “Instances” page to embark on the process.
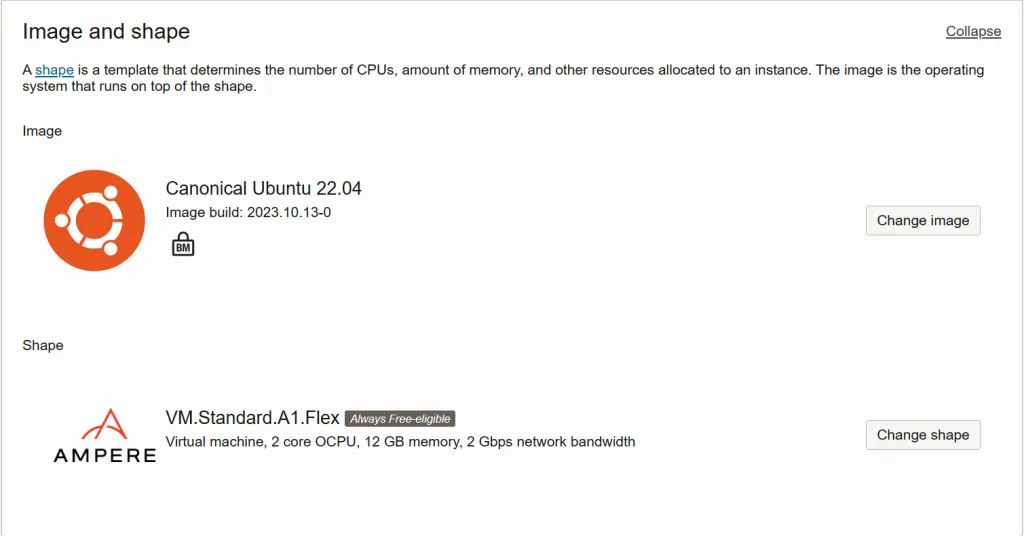
Upon selecting “Create instance,” I began by assigning a name to my instance. The Image was set to “Canonical Ubuntu 22.04,” and for the shape, I opted for “VM.Standard.A1.Flex.” While I personally went with 2 OCPUs and 12GB memory, I found I could scale up to 4 OCPUs and 24 GB of memory – the choice would depend on my specific needs. I reserved the rest for other VMs.
Next, for the virtual network interface card, I established a new virtual cloud network titled “minecraft-paper-docker-vcn” and a corresponding subnet named “minecraft-paper-docker-subnet.” I left the other settings unchanged for simplicity.
I proceeded to download my private SSH key, facilitating terminal access through PuTTY.
Finally, concerning the boot volume, I stuck with the default settings, granting me a spacious 46GB of disk space.
I noticed an apparent monthly cost of two dollars, but rest assured, I’ve yet to encounter any charges personally – a significant improvement over the previous $15 monthly expense.
However, during the setup, I encountered a minor hiccup with an error message: “Out of capacity for shape VM.Standard.A1.Flex in availability domain AD-2.” A swift solution was found by switching the placement to AD1. You may need to perform a similar adjustment based on your circumstances.
Connecting to My VM Using PuTTY
If I made it this far, congrats to me! I should be looking at a screen that provides all the essential details.
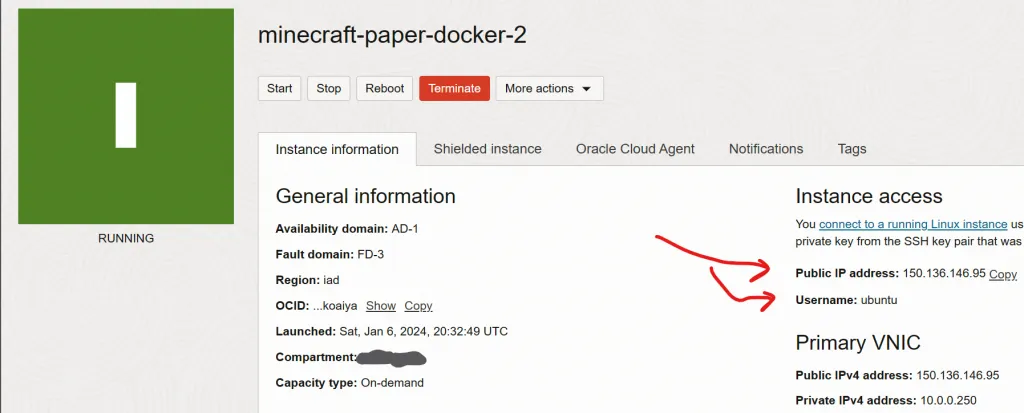
Armed with my IPv4 address, private key, and username, I’m ready to connect. The next step involves installing PuTTY and PuTTYgen on my system.
PuTTY serves as my gateway to the VM, while PuTTYgen is crucial for converting my private key into a format compatible with PuTTY.
To get both tools installed, I downloaded the installer from this link Download PuTTY: latest release (0.80) (greenend.org.uk). I opted for “putty-64bit-0.80-installer.msi” since I use a 64-bit x86 processor. I figured most people would likely need the same version.
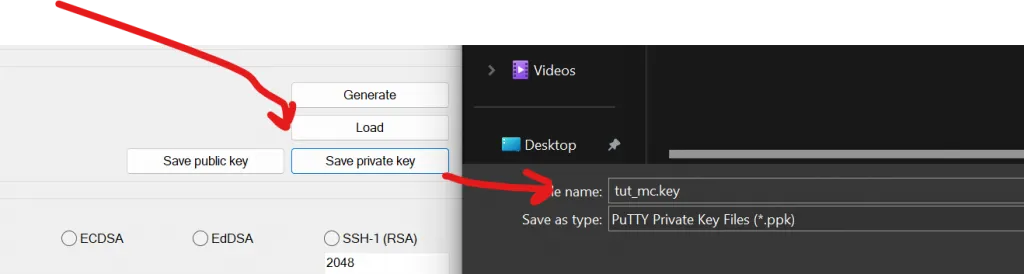
After installation, I launched PuTTYgen and loaded my private key. I had to choose “All Files” to locate my key wherever I downloaded it.
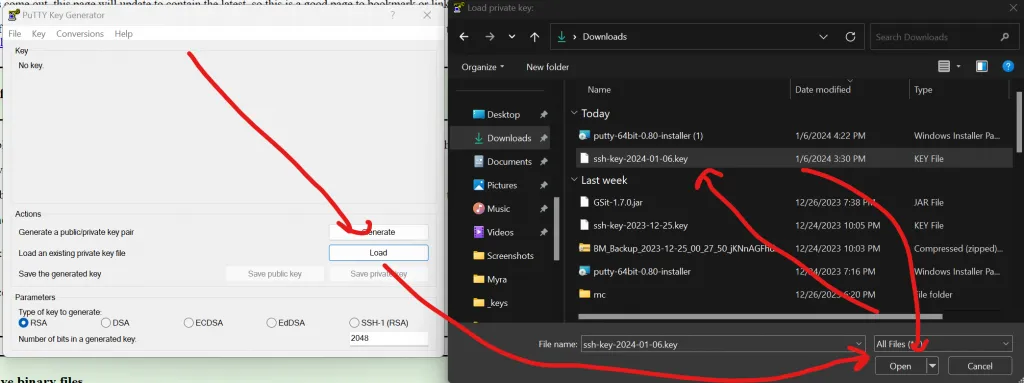
I saved the private key again – it’s now ready for use with PuTTY.
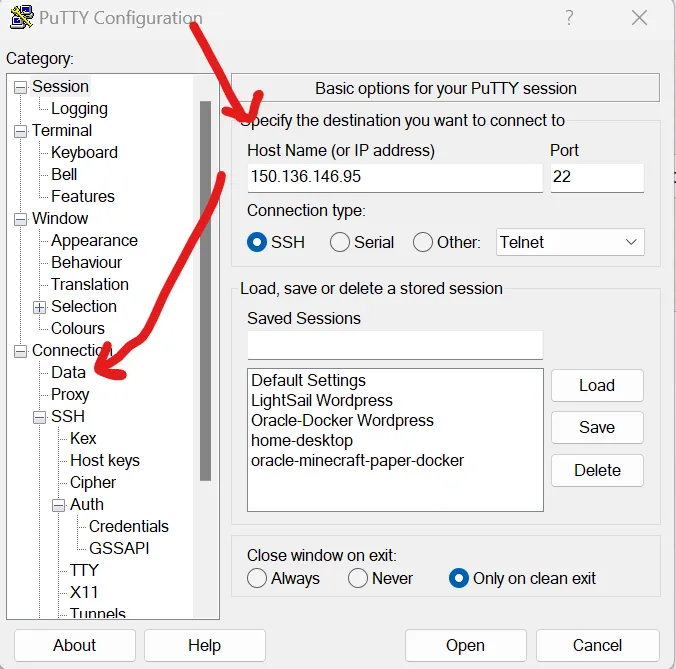
Now, I open PuTTY, enter my IPv4 address, and navigate to Connection/Data.
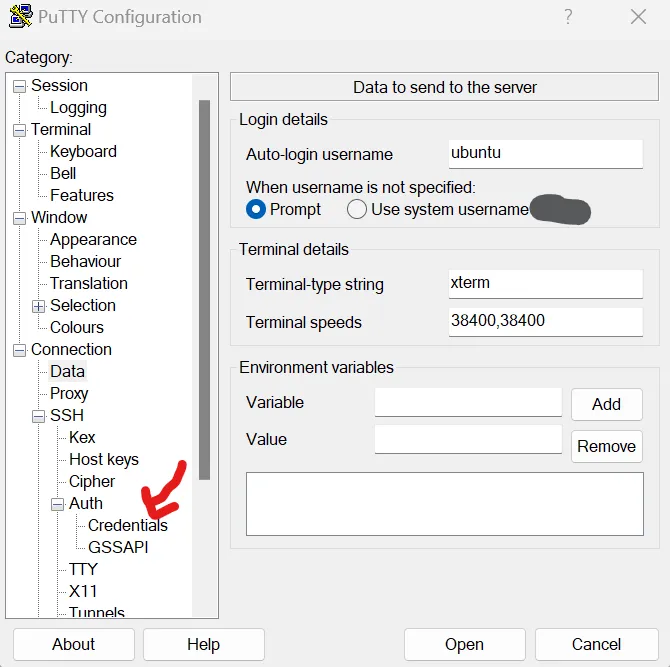
I input my username under “Auto-Login username,” then proceed to Connection/SSH/Auth/Credentials.
I load my PuTTYgen private key then go back to the Session.
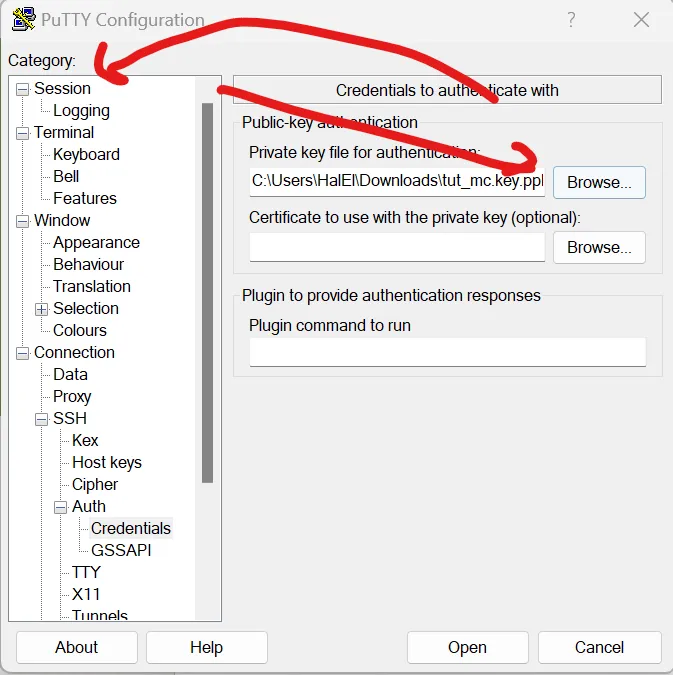
Then enter a saved session name, click Save, and then Open. This way, I can reload the session later.
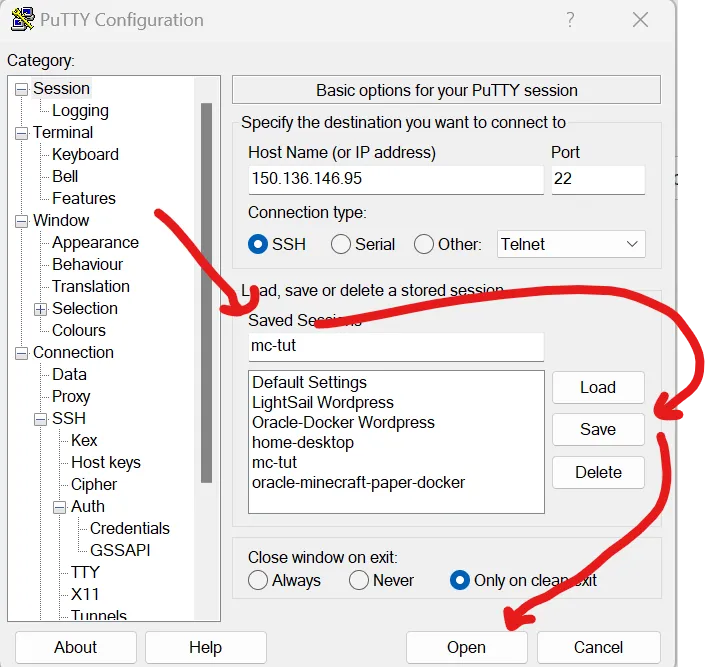
Upon connection, I encounter a popup – I simply press Accept, and I’m in!
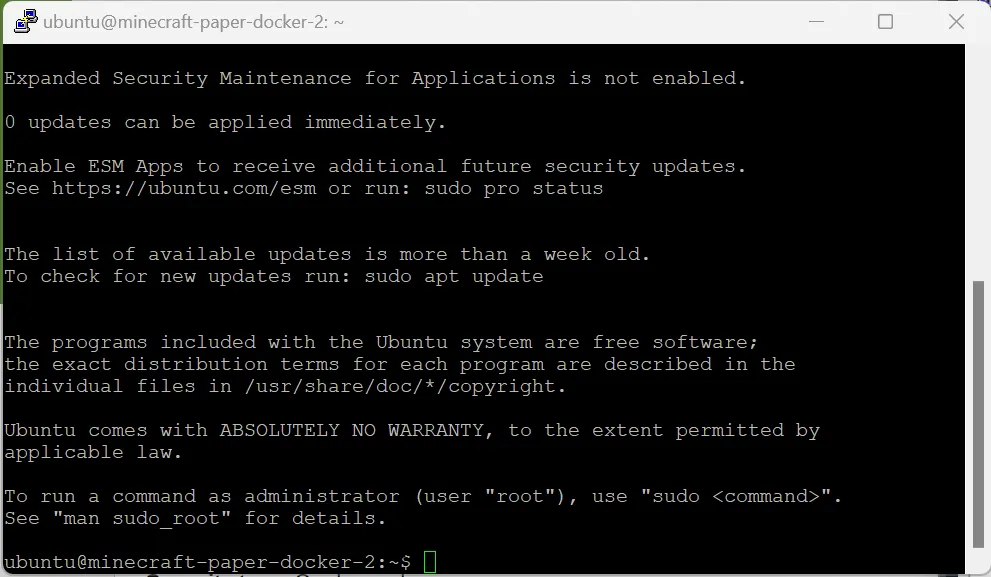
In the terminal, I typed the following commands:
Bash
sudo apt-get update && sudo apt-get upgradeHere’s how I understood it:
“sudo” signifies “using admin power.”
“apt-get” manages software packages.
“apt-get update” fetches the latest updates.
“apt-get upgrade” applies the updates.
”&&” allows me to execute two commands simultaneously.
When prompted to continue, I typed “Y.” If there was a prompt to restart services, I just pressed Enter.
Once these commands finished, my VM was up-to-date. I decided I should consider running these commands monthly to ensure my system runs smoothly.
Installing Docker and Docker Compose on My VM
Now, I wanted to get Docker and Docker Compose up and running on my VM. Docker allows me to run software in my VM, essentially creating mini VMs called containers. In my case, I’d be running Minecraft in one of these containers.
Docker Compose comes into play to make Docker more user-friendly – a boon for someone like me who’s not an expert.
I started entering the commands:
- Adding the Docker Repository Key to apt:
Bash
sudo curl -fsSL https://download.docker.com/linux/ubuntu/gpg | sudo apt-key add -- Installing all of Docker’s dependencies:
Bash
sudo apt install -y apt-transport-https ca-certificates curl software-properties-common- Installing Docker itself:
Bash
sudo apt install -y docker-ce- To confirm the successful installation, I checked for “active (running)” in green using:
Bash
sudo systemctl status dockerI exited out using “Ctrl” + “C.”
Downloading Docker Compose:
Bash
sudo curl -L https://github.com/docker/compose/releases/download/v2.18.1/docker-compose-$(uname -s)-$(uname -m) -o /usr/local/bin/docker-composeNote: While we’re installing the standalone docker-compose binary above, modern Docker installations include Docker Compose as a plugin (accessible via docker compose without the hyphen). However, some systems may still need the standalone version for compatibility.
- Making the program runnable:
Bash
sudo chmod +x /usr/local/bin/docker-compose- Checking if I installed it successfully:
Bash
docker compose versionNote: Use docker compose version (new syntax) or docker-compose --version (legacy) depending on your installation.
If successful, it should display a version number. For me, it did!
Docker and Docker Compose were now successfully installed on my VM.
Running Minecraft in Docker on My VM
Now, I wanted to get Minecraft up and running in Docker on my VM. I was currently in the directory /home/ubuntu. To confirm my current directory, I used the command:
Bash
pwdIf I wasn’t there, I could navigate using:
Bash
cd /home/ubuntuNow, I created a directory for the server and navigated into it:
Bash
mkdir mcBash
cd mc/Next, I created a file called “docker-compose.yaml,” which acts as a blueprint for Docker. This blueprint would construct the Minecraft Server. I used nano, a text editor for the terminal. I ran this command:
Bash
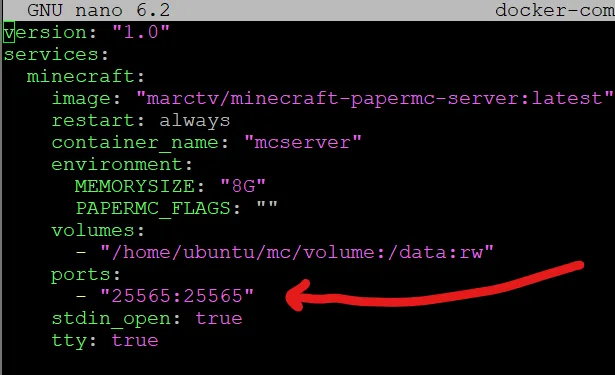
nano docker-compose.yamlMy screen looked like this:
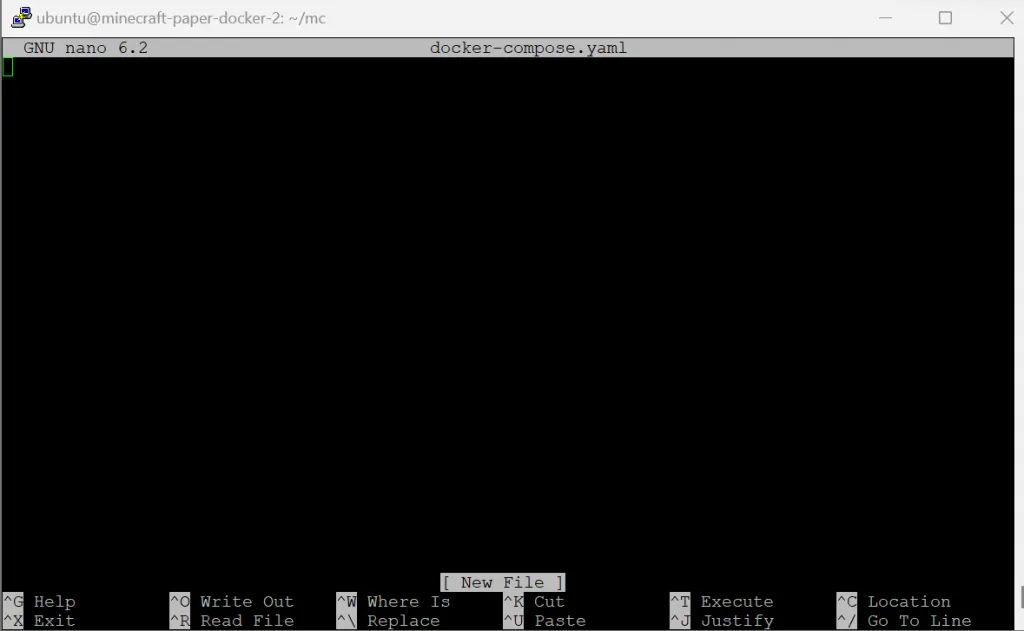
Now, I copied the following YAML configuration:
YAML
version: "1.0"
services:
  minecraft:
    image: "marctv/minecraft-papermc-server:latest"
    restart: always
    container_name: "mcserver"
    environment:
      MEMORYSIZE: "8G"
      PAPERMC_FLAGS: ""
    volumes:
      - "/home/ubuntu/mc/volume:/data:rw"
    ports:
      - "25565:25565"
    stdin_open: true
    tty: true
To paste into Nano, I right-clicked.
A few things I noted:
I paid attention to the “image” field. If I wanted to change the Minecraft version or type, I’d update the image. I found I could find different images here. I was using Paper for a performance boost in vanilla gameplay, but if I wanted to play modded Minecraft, there were likely Docker images available for me on this site.
The “MEMORYSIZE” should be about 70% of my VM’s RAM to ensure smooth operation, or so I read.
The “volumes” setting is where the container’s “disk space” is set up. ”:/data:rw” means the container has read and write access to this location.
Now, I saved and closed Nano:
Press “Ctrl” + “S” to save
Press “Ctrl” + “X” to close
To confirm my success, I used this command:
Bash
cat docker-compose.yamlThis printed out what I wrote in Nano.
Now, I started the party and test ran my Minecraft server:
Bash
sudo docker compose upThis command reads the blueprint and builds the Minecraft server. For me, it worked!
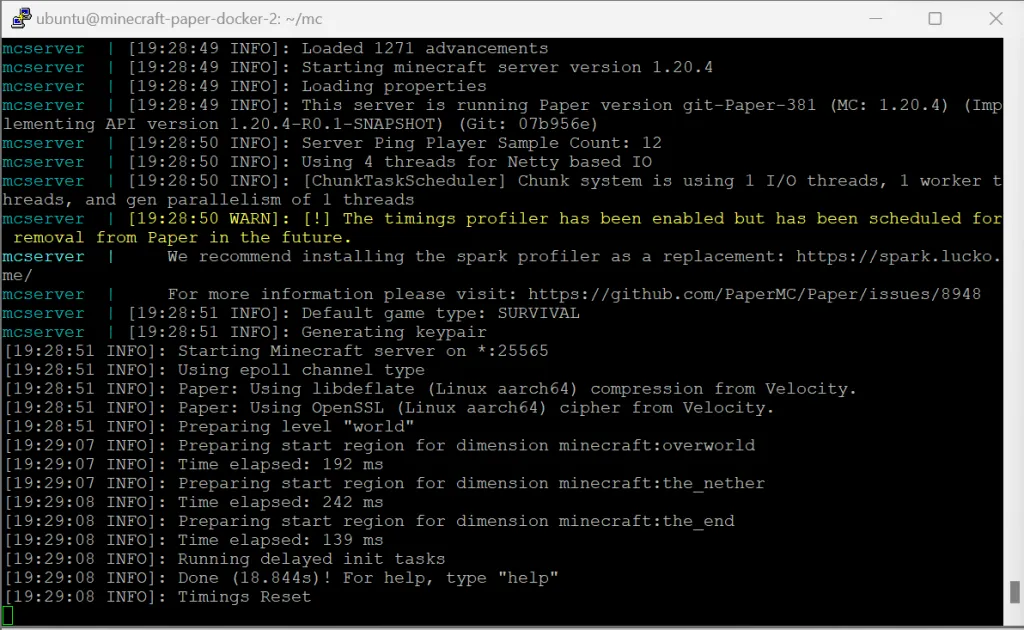
Now that Minecraft had booted up correctly, I pressed “Ctrl” + “C” to close it.
Dealing with Firewalls
Now, I needed to open up three layers of the firewall so that my players could connect to the server.
The first layer was already handled by our blueprint, which was nice.
The next layer was our VM firewall. I used this command:
Bash
sudo iptables -A INPUT -p tcp --dport 25565 -j ACCEPTNow, I needed to open the Oracle Subnet firewall, which I did on the site.
I navigated back to Instances | Oracle Cloud Infrastructure and opened my VM.
Then, I clicked on my Virtual Cloud Network for the VM. I had called mine “minecraft-paper-docker-vcn.”
In there, I clicked on my subnet. I had called mine “minecraft-paper-docker-subnet.”
Now, I clicked on the only security list there. Mine was called “Default Security List for minecraft-paper-docker-vcn.”
I clicked “Add Ingress Rules.”
I set “Source CIDR” to “0.0.0.0/0”, “Destination Port Range” to “25565.” and “IP Protocol” to “UDP.”
I pressed “Add Ingress Rules.”
Now, I repeated the process, but this time, in addition to setting “Source CIDR” and “Destination Port Range,” I set “IP Protocol” to “TCP.”
Now, I had successfully opened port 25565 on TCP and UDP in the Oracle Subnet.
Testing the Minecraft Server with My Player
Now, I test ran my server once more, but this time, I tried to join the server as a player. I ran this command again:
Bash
sudo docker compose upI used my VM’s public IPv4 address in Minecraft.
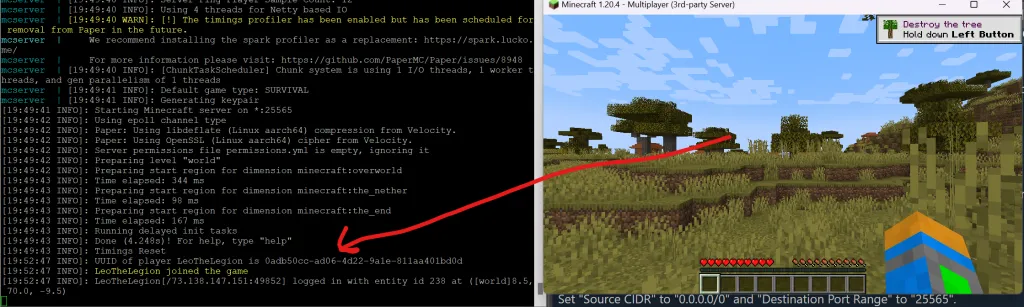
I did it! I could technically start sharing my IP with my friends and start playing now. However, there was one more thing to save me some grief. The server was only up as long as my terminal was up.
To fix that, I added “-d” to my start command:
Bash
sudo docker compose up -dThis still boots the server but runs it in the background, which is what I wanted.
If I wanted to check if my server was running, I could use this command:
Bash
sudo docker compose lsWrapping Up My Minecraft Server Journey
So, that’s how I got my Minecraft server running on Oracle Cloud with Docker! It’s been a great way to keep costs down while getting good performance for playing with friends.
This Docker and Oracle Cloud setup is pretty flexible. I can tweak settings or give the server more resources if needed.
I’m still learning what else I can do with Docker to fine-tune the server. Keeping things updated is also a good idea for the latest improvements.
If you run into trouble or have questions, the Minecraft and Docker communities are usually very helpful.
If you follow my journey and have a free, high-performance Minecraft server up and running, you might want to boost the visuals. If you or your players enjoy impressive long-distance views, the Distant Horizons mod is a great client-side choice. To make sure your server can provide the data for these views, you’ll need the Distant Horizons server plugin. I’ve put together a guide on how to install it here: Install Distant Horizons on Your Minecraft Server: Bukkit, Spigot, Paper, Folia Guide