· Tutorials · 7 min read
Reduce your Docker Image size with these easy tips
Tired of wasting disk space on bloated Docker images? Let's get lean and mean! Join me as we dive into effective techniques to optimize your Docker image size and maximize your resources.
Tired of wasting disk space on bloated Docker images? Let’s get lean and mean! Join me as we dive into effective techniques to optimize your Docker image size and maximize your resources.
Why does Docker Image Size matter?
Docker image size is important because it affects how fast and efficiently you can work with containers. Here’s why it matters:
Faster Downloads and Deployments: Smaller images download and deploy faster, saving time during development and production.
Less Disk Space: A smaller image takes up less space, which is especially helpful if you’re working on limited storage.
Improved Security: Fewer libraries and tools in an image mean fewer places for security issues to hide.
Better Performance: Smaller images can use less memory and CPU, helping your apps run more smoothly.
Easier Maintenance: With fewer parts, smaller images are simpler to debug and keep up-to-date.
In this blog post, we are going to go over some tips that can help keep Docker images lean and efficient!
The Example Project for our Docker Image
Click to see how the example project is made
To illustrate these optimization techniques, let’s build a basic Vue project using the following commands:
Bash
npm create vue@latest
cd npm-docker-image-tut
npm i
npm run dev
When prompted by npm create vue@latest, I said Yes to all prompt to simulate a typical project setup.
To further mimic a real-world scenario, let’s also create a built version of the project:
Bash
npm run buildHere is what we have after running and building our example project once:
Our Baseline Docker Image
In order to show off our tips, here’s a functional Dockerfile to get started with.
Dockerfile
# Use an official Node.js image as the base image
FROM node:20

# Set the working directory inside the container
WORKDIR /app

# Copy package.json and package-lock.json
COPY package*.json ./

# Install dependencies
RUN npm install

# Copy the rest of the project files
COPY . .

# Build the Vue.js project
RUN npm run build

# Expose the necessary port
EXPOSE 8080

# Start the application
CMD ["npm", "run", "serve"]
While it is getting the job done but it has a staggering image size of 1.43 GB. Copying all the files in our project’s directory into the image is a bad idea. Let’s tackle that first.
Let’s Apply Some Tips
01) Create a .dockerignore file
Without changing anything to the “Dockerfile” file, we could ignore any files that the image does not need directly. We can do this by creating a “.dockerignore” file in the same directory as our “Dockerfile” file.
.dockerignore
# Ignore node_modules directory
node_modules

# Ignore npm debug logs
npm-debug.log*

# Ignore npm error logs
npm-error.log*

# Ignore .env file
.env

# Ignore build artifacts
build

# Ignore test coverage reports
coverage

# Ignore any other temporary or generated files
*.tmp
*.swp
.DS_Store

# Ignore the .git directory
.git

# Ignore the .vscode directory
.vscode

# Ignore the dist directory
dist

# Ignore the e2e directory
e2e
Now the image is built with the essential files only. While this is great start, this still produces a staggering 1.28 GB image. Let’s look at the base image we are using.
02) Use a Lighter Base Docker Image
Our base image might be including unnecessary bloat to our image. We could slim it down to the essentials. Let’s find and use an “alpine” version. This type of image uses a lightweight Linux distribution to run your application.
It’s common for “alpine” images end with “-alpine” in their image name so try to add “-alpine” to your base image and see if you get lucky.
Dockerfile
# Use an official light Node.js image as the base image
FROM node:20-alpine

# Set the working directory inside the container
WORKDIR /app

# Copy package.json and package-lock.json
COPY package*.json ./

# Install dependencies
RUN npm install

# Copy the rest of the project files
COPY . .

# Build the Vue.js project
RUN npm run build

# Expose the necessary port
EXPOSE 8080

# Start the application
CMD ["npm", "run", "serve"]
With “alpine” images, you should see a huge space improvement.
Now, our image is 322 MB in size! We could go further than this.
In our example, our app builds and puts all of its essential files to run in production in a sub directory called “dist”. What if we only kept “dist” in our final docker build?
03) Build The Docker Image with Steps
With docker images, we could build in steps and copy data from one step to another. In this case, I’ll build my project which creates a directory called “dist” then copy “dist” into a fresh build step. Then I could just focus getting the requirements to serve “dist”.
Dockerfile
# Use an official light Node.js image as the base image
FROM node:20-alpine as build-stage

# Set the working directory inside the container
WORKDIR /app

# Copy package.json and package-lock.json
COPY package*.json ./

# Install dependencies
RUN npm install

# Copy the rest of the project files
COPY . .

# Build the Vue.js project
RUN npm run build

# Use an official lightweight Node.js image for production
FROM node:20-alpine as production-stage

# Set the working directory inside the container
WORKDIR /app

# Copy the built Vue.js project from the previous stage
COPY --from=build-stage /app/dist /app

# Install the serve package globally
RUN npm install -g serve

# Expose the necessary port
EXPOSE 5000

# Start the application
CMD ["serve", "-s", "."]
This time we cut our image in half. The image is now 146 MB in size! All we have in our image is our “dist” directory and small node environment. Now we can’t make “dist” any smaller so let’s focus our attention to the node environment. Can we use a different method to serve our “dist” directory?
04) Use a lighter final build image
As far as I’m aware, the last base image we use to run our application is the only thing left to worry about. In this case, nginx is the easiest, lightest, and effective way to serve static files from “dist”. We just need to create a “nginx.conf” file and pass that to our final build step.
Dockerfile
# Use an official light Node.js image as the base image
FROM node:20-alpine as build-stage

# Set the working directory inside the container
WORKDIR /app

# Copy package.json and package-lock.json
COPY package*.json ./

# Install dependencies
RUN npm install

# Copy the rest of the project files
COPY . .

# Build the Vue.js project
RUN npm run build

# Use lightweight nginx image for production
FROM nginx:1.19-alpine as production-stage

# Copy the build output to replace the default nginx contents
COPY --from=build-stage /app/dist /usr/share/nginx/html

# Copy the custom nginx configuration
COPY nginx.conf /etc/nginx/conf.d/default.conf

# Expose port 80
EXPOSE 80

# Start the nginx server
CMD ["nginx", "-g", "daemon off;"]
nginx.conf
# Set the server port
server {
listen 80;
# Set the root directory for the SPA
root /usr/share/nginx/html;
# Enable gzip compression
gzip on;
gzip_types text/plain text/css application/javascript application/json;
# Serve index.html for all requests
location / {
try_files $uri $uri/ /index.html;
}
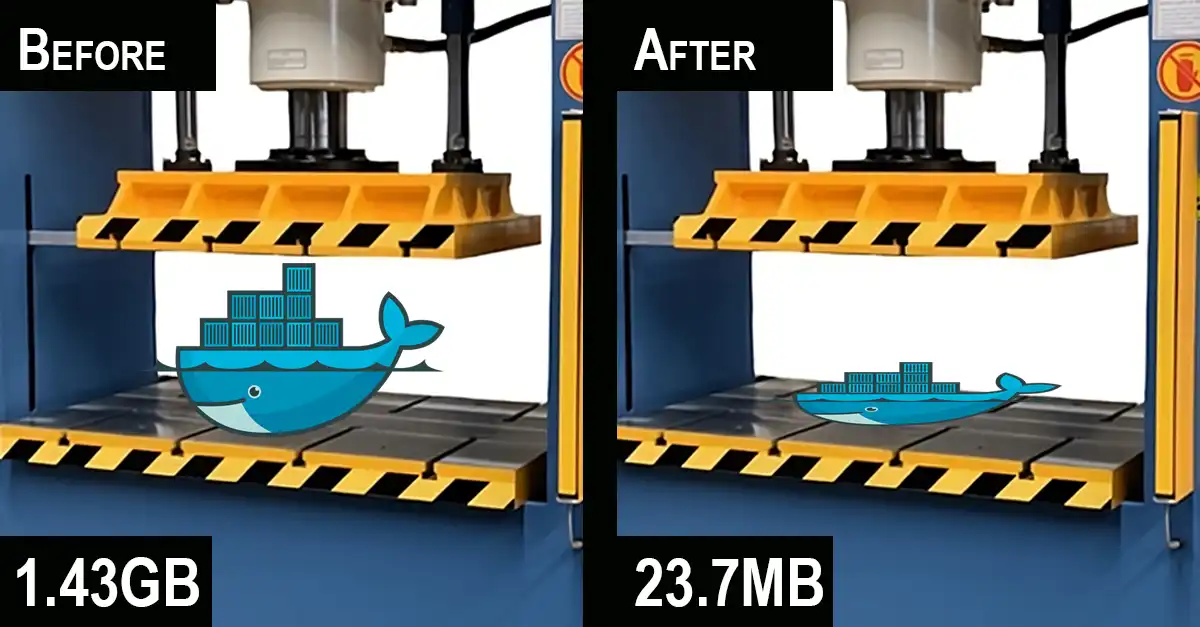
}Now hold on to your seat with this new size… 22.69 MB. Amazing, right? It’s a huge jump from 1.43 GB. Imagine your savings for each build!
Now try it!
Try what your learned here, and I would love to hear about your experience in the comments section or on my linkedin post. If I missed anything, please let me know too! I would like to update this post as I discover more techniques.
Also are you looking for a free solution to host your projects? I suggest taking a look at this post about how I found a way to host my Minecraft server for free!