· Tutorials · 17 min read
Use Docker to Set Up a Self-Hosted GitHub Actions Runner in 10 Minutes
Run unlimited GitHub Actions builds on your own hardware with complete control! Learn how to set up a containerized self-hosted GitHub Actions runner in just 10 minutes.
Why Self-Host Your GitHub Actions Runner?
Want complete control over your GitHub Actions environment? Self-hosted runners give you exactly that. While GitHub’s hosted runners are convenient, they come with execution time limits and monthly minute allowances. By self-hosting, you can run unlimited builds on your own hardware with a completely custom environment.
Here’s why self-hosting might be perfect for you:
- Unlimited Minutes: No more worrying about monthly limits.
- Custom Environment: Install exactly the software and tools you need.
- Better Performance: Use your own powerful hardware for faster builds.
- Cost Savings: Perfect for teams with heavy CI/CD usage.
- Privacy: Keep sensitive builds and data on your own infrastructure.
- Faster Builds: Skip download times for large dependencies by caching them on your runner.
Prerequisites
Before we dive in, make sure you have:
- A computer or server (Windows, macOS, or Linux - even a Raspberry Pi works!)
- Admin access to your GitHub repository
- Internet connection for the runner to communicate with GitHub
- Basic terminal/command line knowledge
If you’re planning to use Docker containers in your workflows, you might want to follow my guide on installing Docker and Docker Compose first.
System Requirements
GitHub Actions runners are surprisingly lightweight:
- RAM: 2GB minimum (4GB recommended for Docker workflows)
- Storage: 10GB free space for the runner and your builds
- CPU: Any modern processor (x64, ARM64, ARM32 supported)
- Network: Stable internet connection to GitHub
Step-by-Step Setup Guide with Docker
We’ll use Docker to run our GitHub Actions runner in a container. This approach is cleaner, more secure, and easier to manage than installing directly on the host system.
Step 1: Create a Personal Access Token (ACCESS_TOKEN)
This guide now uses a Personal Access Token (PAT) for automatic runner registration and token refresh.
How to Create Your ACCESS_TOKEN
- Go to GitHub Personal Access Tokens
- Click Generate new token (classic)
- Give your token a name (e.g., “Self-hosted Runner”)
- Select the following scopes:
repo(for access to your repository)workflow(for managing workflow runs)
- Click Generate token
- Copy your new token (it starts with
ghp_...). You will use this asACCESS_TOKENin your.envfile for the Docker setup.
Important: Keep your Personal Access Token secret! Never share it or commit it to source control.
Our script(later!) will use this token to automatically generate and refresh registration tokens as needed.
Step 2: Create the Docker Setup
Create a new directory for your runner:
mkdir github-runner && cd github-runnerFirst, let’s create our own Dockerfile for security and control:
Create a Dockerfile:
FROM ubuntu:22.04

# Avoid prompts from apt
ENV DEBIAN_FRONTEND=noninteractive

# Install dependencies
RUN apt-get update && apt-get install -y \
    curl \
    wget \
    unzip \
    git \
    jq \
    build-essential \
    libssl-dev \
    libffi-dev \
    python3 \
    python3-pip \
    apt-transport-https \
    ca-certificates \
    gnupg \
    lsb-release \
    sudo \
    && rm -rf /var/lib/apt/lists/*

# Install Docker CLI
RUN curl -fsSL https://download.docker.com/linux/ubuntu/gpg | gpg --dearmor -o /usr/share/keyrings/docker-archive-keyring.gpg \
    && echo "deb [arch=$(dpkg --print-architecture) signed-by=/usr/share/keyrings/docker-archive-keyring.gpg] https://download.docker.com/linux/ubuntu $(lsb_release -cs) stable" | tee /etc/apt/sources.list.d/docker.list > /dev/null \
    && apt-get update \
    && apt-get install -y docker-ce-cli \
    && rm -rf /var/lib/apt/lists/*

# Create a runner user
RUN useradd -m -s /bin/bash runner \
    && usermod -aG sudo runner \
    && echo "runner ALL=(ALL) NOPASSWD:ALL" >> /etc/sudoers

# Create GitHub-compatible workspace structure as root
RUN mkdir -p /github/workspace && \
    chown -R runner:runner /github /github/workspace


# Switch to runner user and set working directory to GitHub Actions workspace
USER runner
WORKDIR /github/workspace

# Download and install GitHub Actions runner
ARG RUNNER_ARCH=arm64
RUN RUNNER_VERSION=$(curl -s https://api.github.com/repos/actions/runner/releases/latest | grep '"tag_name"' | cut -d'"' -f4 | sed 's/v//') \
    && echo "Installing GitHub Actions Runner version: $RUNNER_VERSION" \
    && curl -o actions-runner-linux-${RUNNER_ARCH}-${RUNNER_VERSION}.tar.gz -L https://github.com/actions/runner/releases/download/v${RUNNER_VERSION}/actions-runner-linux-${RUNNER_ARCH}-${RUNNER_VERSION}.tar.gz \
    && tar xzf ./actions-runner-linux-${RUNNER_ARCH}-${RUNNER_VERSION}.tar.gz \
    && rm actions-runner-linux-${RUNNER_ARCH}-${RUNNER_VERSION}.tar.gz \
    && sudo ./bin/installdependencies.sh

# Copy our startup script
COPY --chown=runner:runner start.sh /github/workspace/start.sh
RUN chmod +x /github/workspace/start.sh

CMD ["/github/workspace/start.sh"]
Create a start.sh script:
#!/bin/bash

# Function to get a fresh runner token using Personal Access Token
get_runner_token() {
    echo "Getting fresh runner token using Personal Access Token..."

    if [[ -z "${ACCESS_TOKEN}" ]]; then
        echo "ERROR: ACCESS_TOKEN is required but not provided"
        echo "Please set your Personal Access Token in the ACCESS_TOKEN environment variable"
        echo "Create one at: https://github.com/settings/tokens with 'repo' and 'workflow' scopes"
        exit 1
    fi

    # Extract repo owner and name from REPO_URL
    REPO_PATH=$(echo "${REPO_URL}" | sed 's|https://github.com/||')

    RESPONSE=$(curl -s -X POST \
        -H "Authorization: token ${ACCESS_TOKEN}" \
        -H "Accept: application/vnd.github.v3+json" \
        "https://api.github.com/repos/${REPO_PATH}/actions/runners/registration-token")

    # Extract the token from the JSON response using sed
    RUNNER_TOKEN=$(echo "$RESPONSE" | sed -n 's/.*"token"[[:space:]]*:[[:space:]]*"\([^"]*\)".*/\1/p')

    if [[ -n "$RUNNER_TOKEN" ]]; then
        echo "Successfully obtained fresh runner token"
        export RUNNER_TOKEN
        return 0
    else
        echo "Failed to extract runner token from response: $RESPONSE"
        echo "Please check your ACCESS_TOKEN and repository permissions"
        exit 1
    fi
}

# Function to remove existing runner via GitHub API
remove_runner() {
    local runner_name="${RUNNER_NAME:-$(hostname)}"
    echo "Removing any existing runner with name: $runner_name"

    # Extract repo owner and name from REPO_URL
    REPO_PATH=$(echo "${REPO_URL}" | sed 's|https://github.com/||')

    # Get list of runners and find the one with our name
    RUNNERS_RESPONSE=$(curl -s -H "Authorization: token ${ACCESS_TOKEN}" \
        -H "Accept: application/vnd.github.v3+json" \
        "https://api.github.com/repos/${REPO_PATH}/actions/runners")

    # Extract runner ID - try multiple parsing approaches
    RUNNER_ID=$(echo "$RUNNERS_RESPONSE" | sed -n "s/.*\"id\":[[:space:]]*\([0-9]*\),.*\"name\":[[:space:]]*\"$runner_name\".*/\1/p")

    if [[ -z "$RUNNER_ID" ]]; then
        # Alternative parsing method
        RUNNER_ID=$(echo "$RUNNERS_RESPONSE" | grep -B 5 "\"name\":\"$runner_name\"" | grep -o '"id":[0-9]*' | cut -d':' -f2 | head -1)
    fi

    if [[ -n "$RUNNER_ID" ]]; then
        echo "Found existing runner with ID: $RUNNER_ID, removing it..."
        curl -s -X DELETE \
            -H "Authorization: token ${ACCESS_TOKEN}" \
            -H "Accept: application/vnd.github.v3+json" \
            "https://api.github.com/repos/${REPO_PATH}/actions/runners/$RUNNER_ID" > /dev/null
        echo "Runner removed via GitHub API"
        # Give GitHub a moment to process the deletion
        sleep 2
    else
        echo "No existing runner found with name: $runner_name"
    fi
}

# Function to setup/configure the runner
setup_runner() {
    remove_runner

    echo "Configuring runner for repository: ${REPO_URL}"
    ./config.sh --unattended \
        --url ${REPO_URL} \
        --token ${RUNNER_TOKEN} \
        --name ${RUNNER_NAME:-$(hostname)} \
        --work /github/workspace \
        --labels ${LABELS:-self-hosted,linux,x64,docker} \
        --replace
}

# Background token refresh service
token_refresh_service() {
    local refresh_interval=3000  # 50 minutes in seconds

    while true; do
        sleep $refresh_interval
        echo "$(date): Auto-refreshing runner token..."

        # Get new token
        if get_runner_token; then
            echo "$(date): Successfully refreshed token, restarting runner..."

            # Find and gracefully stop the current runner
            local runner_pid=$(pgrep -f "Runner.Listener")
            if [[ -n "$runner_pid" ]]; then
                echo "$(date): Stopping current runner (PID: $runner_pid)"
                kill -TERM "$runner_pid"

                # Wait for graceful shutdown
                local timeout=30
                while [[ $timeout -gt 0 ]] && kill -0 "$runner_pid" 2>/dev/null; do
                    sleep 1
                    ((timeout--))
                done

                # Force kill if still running
                if kill -0 "$runner_pid" 2>/dev/null; then
                    echo "$(date): Force killing runner"
                    kill -KILL "$runner_pid"
                fi
            fi

            # Reconfigure and restart runner
            echo "$(date): Reconfiguring runner with fresh token..."
            setup_runner

            echo "$(date): Starting refreshed runner..."
            ./run.sh &
            RUNNER_PID=$!

            echo "$(date): Runner restarted successfully with PID: $RUNNER_PID"
        else
            echo "$(date): Failed to refresh token, keeping current runner"
        fi
    done
}

# Function to remove runner on exit
cleanup() {
    echo "Cleaning up..."

    # Stop token refresh service if running
    if [[ -n "$REFRESH_PID" ]]; then
        echo "Stopping token refresh service..."
        kill "$REFRESH_PID" 2>/dev/null || true
    fi

    # Stop runner if running
    if [[ -n "$RUNNER_PID" ]]; then
        echo "Stopping runner..."
        kill "$RUNNER_PID" 2>/dev/null || true
    fi

    # Always remove runner on exit since we clean up on startup anyway
    echo "Removing runner registration..."
    # Try local config removal first, then API removal as fallback
    ./config.sh remove --unattended --token ${RUNNER_TOKEN} 2>/dev/null || remove_runner
}
trap 'cleanup; exit 130' INT
trap 'cleanup; exit 143' TERM


# Add runner to docker group for Docker socket access if DOCKER_GID is set
if [[ -n "$DOCKER_GID" ]]; then
    if ! getent group docker >/dev/null; then
        sudo groupadd -g "$DOCKER_GID" docker
    fi
    sudo usermod -aG docker runner
    echo "Added runner to docker group with GID $DOCKER_GID"
else
    echo "DOCKER_GID not set, skipping docker group setup."
fi

# Get fresh runner token at startup
get_runner_token

# Setup the runner
setup_runner

# Start the token refresh service in background
echo "Starting token refresh service..."
token_refresh_service &
REFRESH_PID=$!
echo "Token refresh service started (PID: $REFRESH_PID)"

# Start the runner
echo "Starting GitHub Actions runner..."
./run.sh &
RUNNER_PID=$!
echo "Runner started (PID: $RUNNER_PID)"

# Wait for the runner process
wait $RUNNER_PID
Now create a docker-compose.yml file:
services:
  github-runner:
    # Build the runner image with dynamic configuration
    build:
      context: .
      args:
        # CPU architecture for the runner (arm64 for Raspberry Pi)
        RUNNER_ARCH: arm64
        # Docker-in-Docker capabilities
        # Docker group ID from host system - must match host's docker group
        # Get with: getent group docker | cut -d: -f3
        DOCKER_GID: ${DOCKER_GID}

    # Load environment variables from .env file
    env_file:
      - .env

    # Runtime environment configuration
    environment:
      # GitHub repository URL to register runner with
      REPO_URL: https://github.com/YOUR_USER/YOUR_REPO

      # Personal Access Token for automatic runner token generation
      # Create at: https://github.com/settings/tokens with 'repo' and 'workflow' scopes
      ACCESS_TOKEN: ${ACCESS_TOKEN}

      # Custom name for this runner instance
      RUNNER_NAME: docker-runner
      # Labels for workflow targeting (comma-separated)
      LABELS: linux,arm64,docker

    # Mount Docker socket for Docker-in-Docker capabilities
    volumes:
      - /var/run/docker.sock:/var/run/docker.sock

    # Automatically restart unless manually stopped
    restart: unless-stopped
Important Configuration Notes:
- Architecture: Set
RUNNER_ARCHtoarm64for Raspberry Pi/ARM processors, orx64for Intel/AMD processors - Token Security: Use
${ACCESS_TOKEN}in your.envfile for automatic runner token generation - Repository Setup: Set
REPO_URLto your actual repository URL - Labels: Update the architecture in labels (
arm64orx64) to match your system
Setting up the environment variable: Create a .env file in the same directory. Example:
# Personal Access Token - Create at: https://github.com/settings/tokens
# Required scopes: 'repo' and 'workflow'
# This will automatically generate fresh runner tokens as needed
ACCESS_TOKEN=ghp_XXXXXXXXXXXX

# If you want to use docker actions
# Docker group ID from host system (run: getent group docker | cut -d: -f3)
DOCKER_GID=992
If you are gonna use git, make sure to add .env to your .gitignore to keep your token secure!
Your directory should now look like this:
github-runner/
├── Dockerfile
├── start.sh
├── docker-compose.yml
├── .env
Step 3: Build and Start Your Dockerized Runner
Build the custom image and start the runner:
# Build the custom runner image
docker compose build

# Start the runner container
docker compose up -d
Check if it’s running:
docker compose logs -f github-runnerYou should see output like:
github-runner_1  | Configuring runner for organization: YourOrgName
github-runner_1  |
github-runner_1  | --------------------------------------------------------------------------------
github-runner_1  | |        ____ _ _   _   _       _          _        _   _                      |
github-runner_1  | |       / ___(_) |_| | | |_   _| |__      / \   ___| |_(_) ___  _ __  ___      |
github-runner_1  | |      | |  _| | __| |_| | | | | '_ \    / _ \ / __| __| |/ _ \| '_ \/ __|     |
github-runner_1  | |      | |_| | | |_|  _  | |_| | |_) |  / ___ \ (__| |_| | (_) | | | \__ \     |
github-runner_1  | |       \____|_|\__|_| |_|\__,_|_.__/  /_/   \_\___|\__|_|\___/|_| |_|___/     |
github-runner_1  | |                                                                              |
github-runner_1  | |                       Self-hosted runner registration                       |
github-runner_1  | |                                                                              |
github-runner_1  | --------------------------------------------------------------------------------
github-runner_1  |
github-runner_1  | √ Connected to GitHub
github-runner_1  |
github-runner_1  | Current runner version: '2.311.0'
github-runner_1  | 2025-07-26 10:30:15Z: Listening for Jobs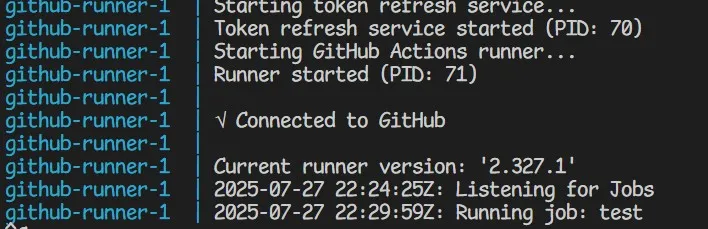
🎉 Congratulations! Your custom containerized self-hosted runner is now active and ready to handle your GitHub Actions workflows!

Managing Your Dockerized Runner
Checking Runner Status
# View logs
docker compose logs -f github-runner

# Check if container is running
docker compose ps

# Restart the runner
docker compose restart github-runner
Updating the Runner
To update to the latest runner version:
# Rebuild with latest runner version (automatically fetches the newest release)
docker compose build --no-cache

# Restart with new image
docker compose up -d
The Dockerfile automatically downloads the latest GitHub Actions runner version from GitHub’s API, so you’ll always get the most current release when rebuilding.
Stopping the Runner
# Stop the runner
docker compose down

# Stop and remove volumes (clean slate)
docker compose down -v
Using Your Self-Hosted Runner
You can target your self-hosted runner by labels or by runner name in your workflow YAML. For most cases, using labels is recommended:
name: CI
on: [push, pull_request]

jobs:
  build:
    runs-on: [self-hosted, linux, docker] # Targets any runner with these labels
    steps:
      - uses: actions/checkout@v4
      - name: Run tests
        run: |
          echo "Running on my containerized runner!"
          # Your build commands here
Or, to target a specific runner by name:
name: CI
on: [push, pull_request]

jobs:
  build:
    runs-on: docker-runner # Targets only this specific runner
    steps:
      - uses: actions/checkout@v4
      - name: Run tests
        run: |
          echo "Running on my specific runner!"
          # Your build commands here
Labels vs Names: When to Use Which
Use Labels when:
- ✅ You have multiple runners with similar capabilities
- ✅ You want automatic load balancing
- ✅ You want flexibility to add more runners later
- ✅ You want to target runners by their capabilities (e.g.,
gpu,large-memory)
Use Specific Names when:
- ✅ You need a job to run on a particular machine
- ✅ You have runners with different configurations
- ✅ You want predictable job placement
What Happens When a Runner is Busy?
Important: A single runner can only execute one job at a time. If you have multiple jobs that need to run simultaneously, they will be queued and run sequentially. For example, if two jobs are triggered at the same time, the second job will wait in the queue until the first one is complete.
To run jobs in parallel, you need multiple runners (see the scaling section below).
Security Considerations
Important: While Docker containers provide better isolation than bare metal installations, self-hosted runners still require careful security considerations.
Why Our Custom Docker Setup is Safer
Our Docker setup provides several security layers that make it safer than running the agent directly on the host or using a third-party image:
- Container Isolation: The runner runs in an isolated container environment, separate from your host system.
- Non-Root Execution: The runner process runs as a non-privileged
runneruser inside the container. - Controlled Dependencies: You explicitly define what software is installed in your custom image, reducing the attack surface.
- Easy Cleanup: Containers can be destroyed and recreated easily, removing any potential contamination from a job.
- No Third-Party Trust: You control the entire image build process, avoiding the risks of third-party images.
Docker Security Best Practices
What we’re doing right:
- ✅ Custom image: Building our own image instead of trusting third-party runner images.
- ✅ Non-privileged container: Not running with
--privilegedor--user root. - ✅ Explicit dependencies: Only installing what we need in the Dockerfile.
- ✅ Clean base image: Starting with official Ubuntu 22.04 LTS.
Additional security measures to consider:
- 🔒 Private repos only: Never use self-hosted runners for public repositories (anyone can submit malicious PRs).
- 🔒 Network isolation: Consider firewall rules to limit the container’s network access.
- 🔒 Resource limits: Set CPU and memory limits in your
docker-compose.ymlto prevent resource exhaustion. - 🔒 Regular updates: Rebuild your image regularly with updated packages and runner versions.
- 🔒 Token management: Rotate runner tokens periodically and store them securely.
Docker Socket Security Warning
Why we mount the Docker socket: This allows workflows to build Docker images, run containers, and use Docker-based actions inside your GitHub Actions workflows. For example:
# This workflow needs Docker access
jobs:
  build:
    runs-on: [self-hosted, linux, docker]
    steps:
      - uses: actions/checkout@v4
      - name: Build Docker image
        run: docker build -t my-app .
      - name: Run tests in container
        run: docker run --rm my-app npm test
However, this comes with serious security implications:
- ⚠️ Container escape risk: Workflows can potentially break out of the container through Docker commands
- ⚠️ Host access: Malicious workflows could potentially access your host system via Docker
- ⚠️ Privilege escalation: Docker socket access is equivalent to root access on the host
Alternative: Secure Setup Without Docker Socket
For basic workflows that don’t need Docker, you can remove the Docker socket mount and the DOCKER_GID build arg entirely:
services:
  github-runner:
    build:
      context: .
      args:
        # CPU architecture for the runner (arm64 for Raspberry Pi)
        RUNNER_ARCH: arm64
        # Docker-in-Docker capabilities
        # Docker group ID from host system - must match host's docker group
        # Get with: getent group docker | cut -d: -f3
        # Remove this line for better security:
        # DOCKER_GID: ${DOCKER_GID}
    env_file:
      - .env
    environment:
      REPO_URL: https://github.com/YOUR_USER/YOUR_REPO
      ACCESS_TOKEN: ${ACCESS_TOKEN}
      RUNNER_NAME: docker-runner
      LABELS: linux,x64
    volumes:
      # Remove this line for better security:
      # - /var/run/docker.sock:/var/run/docker.sock
    restart: unless-stopped
This setup is much more secure and works perfectly for workflows that:
- Build and test code (Node.js, Python, Go, etc.)
- Run scripts and tools
- Deploy to cloud services
- Don’t need to build Docker images or run containers
Mitigation strategies if you DO need Docker:
- Only use with trusted code: Never run untrusted workflows on this setup
- Private repositories only: Public repos allow anyone to submit potentially malicious PRs
- Network isolation: Run on isolated networks or VMs when possible
- Consider rootless Docker: Use Docker’s rootless mode for additional isolation
- Monitor workflows: Review all workflows before they run on your infrastructure
Why Our Custom Docker Setup is Safer Than Alternatives
Compared to bare metal installation:
- Process isolation: Container boundaries limit what a malicious workflow can access
- Easy recovery: Destroy and recreate containers quickly if compromised
- Dependency control: No system-wide package installations that could affect your host
- User isolation: Runner processes can’t access your personal files or system configurations
Compared to third-party Docker images:
- Supply chain security: You control the entire image build process
- Known vulnerabilities: You can patch and update dependencies on your schedule
- No hidden backdoors: Complete transparency in what software is running
- Audit trail: Full visibility into every component and configuration
Recommended production setup:
- Run containers on dedicated VMs or isolated hosts
- Use Docker’s built-in security features like user namespaces
- Implement network policies to restrict container communication
- Set up monitoring and logging for all container activities
- Consider using Docker’s rootless mode for additional security layers
Advanced: Scaling with Multiple Runners
With one runner, jobs run sequentially. To run multiple jobs in parallel, you need multiple runners. Use the same labels to activate parallelism
Targeting Specific Runners vs Labels
You can mix and match approaches based on your needs:
jobs:
  # Using labels for flexibility
  tests:
    runs-on: [self-hosted, linux, docker] # Any runner with these labels

  # Using specific runner name for predictability
  deployment:
    runs-on: docker-runner-1 # Must run on this specific runner

  # Using specialized labels
  gpu-training:
    runs-on: [self-hosted, linux, gpu, cuda] # Only runners with GPU support
Troubleshooting
Runner not appearing in GitHub?
- Check your internet connection
- Verify the token hasn’t expired (tokens expire after a short time)
- Check container logs:
docker compose logs github-runner - Make sure the repository URL is correct
Container keeps restarting?
- Check if Docker is running:
docker ps - Verify the token is still valid (get a new one from GitHub)
- Check logs for error messages:
docker compose logs -f github-runner
Jobs not running on your runner?
- Check if your runner is online in GitHub Settings > Actions > Runners
- Verify your workflow’s
runs-onmatches your runner labels or name - When using labels, make sure your runner has all the labels you specified
- Make sure the runner container is actually running:
docker compose ps
Docker permission issues?
- Ensure Docker is running and accessible
- On Linux, make sure your user is in the
dockergroup - Verify
/var/run/docker.sockis accessible
Performance issues?
- Monitor container resources:
docker stats - Consider setting resource limits in your
docker-compose.yml - Scale up with multiple runner containers
Frequently Asked Questions (FAQ)
What happens if a job is in the queue and my self-hosted runner goes offline?
If a job is queued to run on your self-hosted runner and the runner goes offline (e.g., you shut down the container or the host machine), the job will remain in the queue for up to 24 hours.
- If you bring the runner back online within 24 hours, GitHub will automatically assign the job to the runner once it reconnects.
- If the runner does not come back online within 24 hours, the job will fail and be marked with a “timed out” error in your workflow run.
This 24-hour window gives you plenty of time to restart your runner container or host machine without losing your queued jobs.
Conclusion
You did it! Your containerized GitHub Actions runner is ready to handle all your CI/CD needs. No more monthly minute limits, complete environment control, and the power of Docker isolation - all running on your own terms.
What’s Next?
Now that you have your Docker-based runner set up:
- Scale horizontally by adding more runner containers for parallel builds
- Create custom runner images with your specific tools pre-installed
- Set up resource limits to prevent any single job from consuming all resources
- Monitor performance with Docker stats and logs
- Explore advanced Docker-in-Docker workflows for complex build scenarios
Alternative: Native Installation
While this guide focuses on Docker (which I highly recommend), you can also install the runner directly on your system. Check out GitHub’s official documentation on managing self-hosted runners for the traditional installation method.
For more advanced configurations, check out GitHub’s official documentation on managing self-hosted runners and running scripts on your runners.
Happy building! 🚀