· 9 min read
Securing Your On-Premise Minecraft Server with a Cloud Proxy
Secure your home Minecraft server and hide your IP. Learn to set up a free reverse proxy using Oracle Cloud and Docker for enterprise-grade protection.

The Problem: Exposing Your Home Network
So, you’ve got a Minecraft server running at home, and you want to invite your friends to join. The easiest way is to just give them your home IP address and open a port on your router. But let’s be honest, that feels a bit like leaving your front door wide open. In a world of constant security threats, exposing your home IP address to the public internet is a risky move. It makes you a potential target for DDoS attacks, port scanning, and other malicious activities.

This guide offers a solution: we’ll build a secure reverse proxy using a free Oracle Cloud instance. This proxy will act as a middleman, hiding your home IP address while securely forwarding traffic to your on-premise server.
Prerequisites
Before we start, you’ll need a few things set up:
An Oracle Cloud Instance: This guide builds upon my previous post, Free and Fantastic: My Zero-Cost Oracle Cloud Minecraft Server. You don’t need a Minecraft server running on it, but you should follow the guide up to the “Dealing with Firewalls” section to get your free instance ready.
Docker and Docker Compose: Both your on-premise server and your new cloud instance must have Docker and Docker Compose installed.
- For the Oracle Cloud VM, my guide above covers the installation.
- If your on-premise server is a Raspberry Pi, you can follow my guide on installing Docker and Docker Compose on Raspberry Pi. The same instructions will work for most other Linux-based systems as well.
The Goal: A Secure, Multi-Layered Architecture
Our mission is to hide our home IP address completely and create a secure tunnel for our Minecraft traffic. We’ll use a free Oracle Cloud instance as a public-facing reverse proxy. This means players will connect to the cloud server, and that server will securely forward the traffic to your home server.
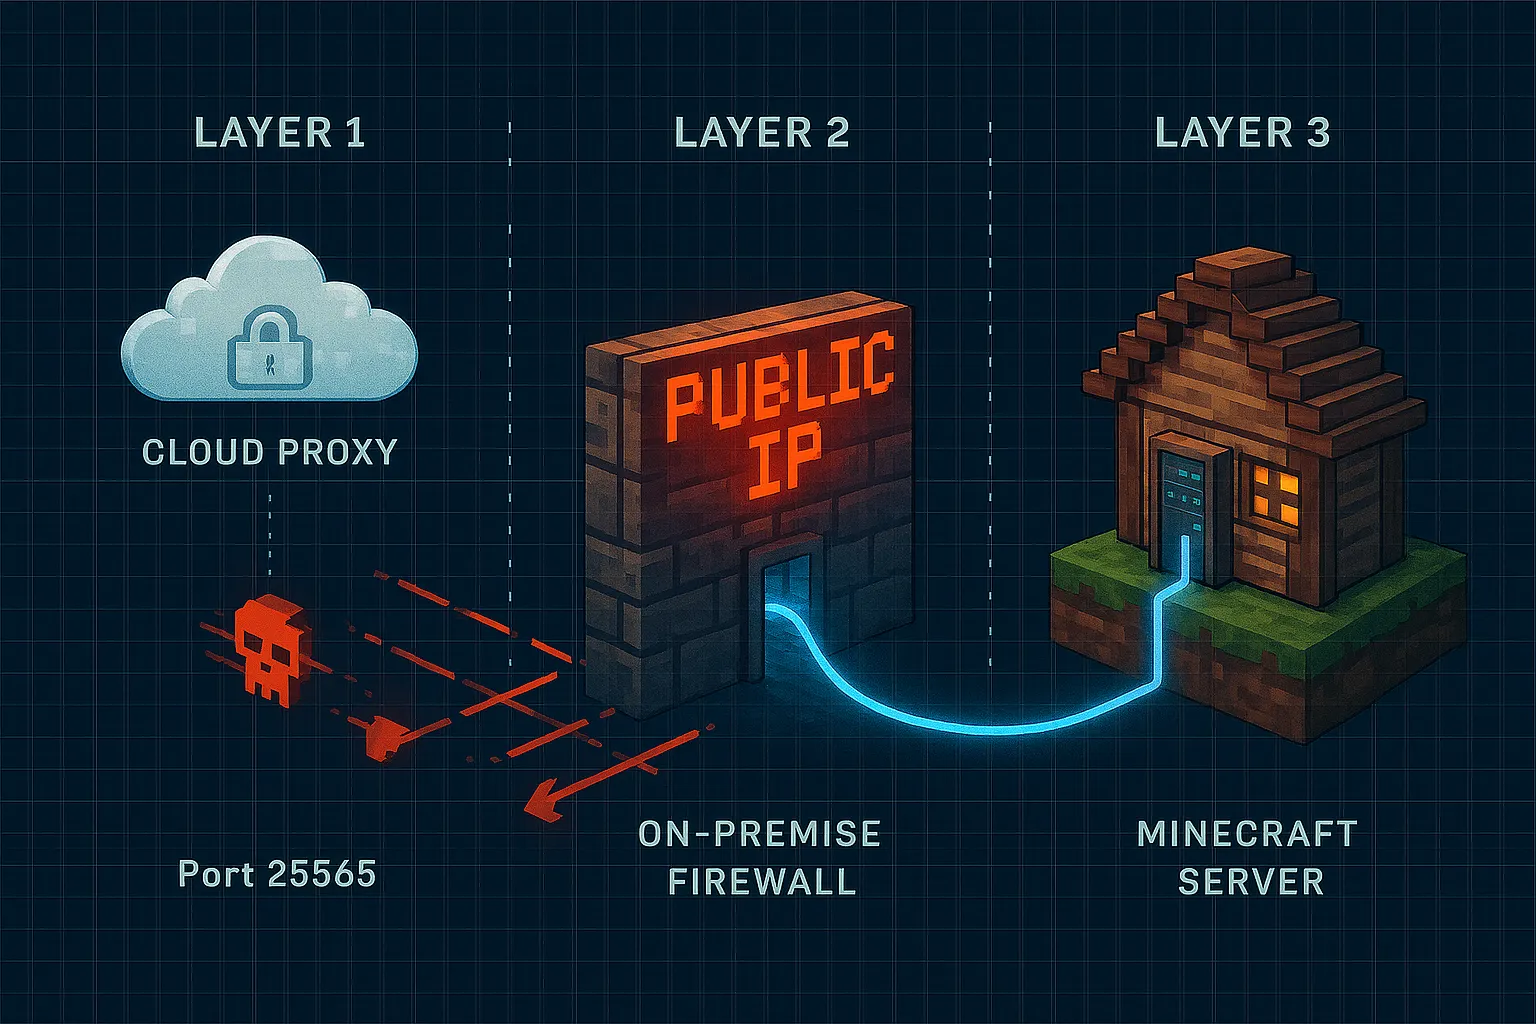
Here’s a high-level look at the architecture we’re building:
Layer 1: The Cloud Proxy (Public Entrypoint)
- An Oracle Cloud instance listens on the standard Minecraft port (
25565). - A
socatDocker container forwards traffic to your home network via a secret, non-standard port.
- An Oracle Cloud instance listens on the standard Minecraft port (
Layer 2: The On-Premise Network
- Your home router forwards traffic from the secret port to your on-premise server.
- The server’s firewall (
ufw) is configured to only accept traffic on this port from the Oracle Cloud instance’s IP address.
Layer 3: The Minecraft Container
- The Minecraft server runs in a Docker container, mapping the secret port to the standard Minecraft port
25565internally.
- The Minecraft server runs in a Docker container, mapping the secret port to the standard Minecraft port
Let’s get our hands dirty and build this thing.
Step 1: Setting Up the Oracle Cloud Proxy
First, you’ll need your Oracle Cloud instance up and running, as detailed in my previous Oracle Cloud post (again, I recommend reading up to the “Dealing with Firewalls” section). Make sure you have Docker and Docker Compose installed.
The magic here is a lightweight tool called socat. We’ll use Docker Compose to define and run it as a service.
Log into your Oracle Cloud instance via SSH.
Create a
.envfile: This file will store your sensitive information. Create a file named.envand add your home IP and secret port:HOME_IP=<YOUR_HOME_IP> HOME_PORT=<YOUR_SECRET_PORT>Create a
docker-compose.ymlfile: Create a new file nameddocker-compose.ymland add the following content:version: '3.8' services: minecraft-proxy: image: alpine/socat:latest restart: unless-stopped ports: - '25565:25565' environment: - HOME_IP=${HOME_IP} - HOME_PORT=${HOME_PORT} command: > sh -c " echo 'Starting Minecraft proxy to ${HOME_IP}:${HOME_PORT}'; socat TCP-LISTEN:25565,fork,reuseaddr TCP:${HOME_IP}:${HOME_PORT} "Run Docker Compose: Now, from the same directory where you saved the files, start the service in detached mode:
docker-compose up -d
Let’s break down the docker-compose.yml file:
image: alpine/socat:latest: The Docker image we’re using.restart: unless-stopped: Ensures the proxy automatically restarts unless manually stopped.ports: - "25565:25565": Publishes the standard Minecraft port.environment: This section loads the variables from your.envfile.command: ...: This is thesocatcommand that does the forwarding, using the environment variables we defined.
Important: As mentioned in my previous Oracle Cloud guide, you need to configure the Oracle Cloud firewall (Security List) to allow incoming TCP traffic on port 25565.
Bonus: Rate Limiting with UFW on the Cloud Proxy
To add another layer of defense against simple denial-of-service attacks, you can use ufw on your cloud proxy to rate-limit incoming connections on the Minecraft port. This will block IPs that try to connect too many times in a short period.
On your Oracle Cloud instance, run the following commands:
# 1. Deny all incoming traffic by default
sudo ufw default deny incoming

# 2. Allow all outgoing traffic
sudo ufw default allow outgoing

# 3. IMPORTANT: Allow SSH so you don't lock yourself out!
sudo ufw limit ssh

# 4. Rate-limit incoming connections on the Minecraft port
sudo ufw limit 25565/tcp

# 5. Enable the firewall
sudo ufw enable
The limit rule allows up to 6 connections from a single IP address within 30 seconds. This is usually enough for legitimate players but can help thwart basic connection floods. You could also delegate this to a docker container and have both the proxy and this firewall container on the same docker network.
Step 2: Configuring Your On-Premise Network
Now, let’s head back home and set up the receiving end. For the on-premise server, I recommend using a stable Linux distribution like Ubuntu Server, and the following steps will be tailored for it.
Port Forwarding: Log into your home router and set up a port forwarding rule. You want to forward incoming traffic on
<YOUR_SECRET_PORT>to the internal IP address of your on-premise server, also on<YOUR_SECRET_PORT>.For example, on a Netgear router, the steps would look something like this:
- Log in to your router’s admin panel (usually at
192.168.1.1). - Go to Advanced > Advanced Setup > Port Forwarding/Port Triggering.
- Select Add Custom Service.
- Give the service a name (e.g., “MinecraftProxy”).
- Set the Protocol to TCP.
- Enter
<YOUR_SECRET_PORT>for both the External Starting Port and Internal Starting Port. - Enter the Internal IP Address of your on-premise server.
- Click Apply to save the rule.
Every router is different, but the general principle is the same: map an external port to an internal IP address and port.
- Log in to your router’s admin panel (usually at
Firewall Hardening with UFW: This is where we add a critical layer of security. We’ll configure the Uncomplicated Firewall (
ufw) on your on-premise server to lock everything down first, then open only the ports we absolutely need.First, make sure
ufwis installed. Then, run these commands in order:# 1. Deny all incoming traffic by default sudo ufw default deny incoming # 2. Allow all outgoing traffic sudo ufw default allow outgoing # 3. IMPORTANT: Allow SSH so you don't lock yourself out! sudo ufw limit ssh # 4. Allow traffic ONLY from your Oracle Cloud IP to your secret port sudo ufw allow from <ORACLE_CLOUD_IP> to any port <YOUR_SECRET_PORT> # 5. Enable the firewall sudo ufw enableLet’s review what this does:
- We start by blocking everything.
- We allow SSH traffic so we can still manage the server.
- The key rule:
allow from <ORACLE_CLOUD_IP> ...ensures that only traffic from your trusted cloud proxy can get through on your secret port. - Finally, we enable the firewall.
Replace
<ORACLE_CLOUD_IP>with the public IP of your Oracle instance and<YOUR_SECRET_PORT>with the port you chose. This rule ensures that even if someone discovers the open port on your home IP, they can’t connect unless they are doing so from your cloud proxy.
Step 3: Running the Minecraft Server
Finally, we’ll run our Minecraft server using Docker Compose on the on-premise machine.
Create a
docker-compose.ymlfile: On your on-premise server, create adocker-compose.ymlfile with this content:version: '3.8' services: minecraft-server: image: itzg/minecraft-server ports: - '<YOUR_SECRET_PORT>:25565' environment: EULA: 'TRUE' volumes: - ./minecraft-data:/data restart: alwaysRun Docker Compose:
docker-compose up -d
Let’s look at the docker-compose.yml:
image: itzg/minecraft-server: The popular Minecraft server image.ports: - "<YOUR_SECRET_PORT>:25565": This maps the secret port on your server to the standard Minecraft port inside the container.environment: EULA: "TRUE": Accepts the Minecraft EULA.volumes: - ./minecraft-data:/data: This is important! It saves your Minecraft world data to aminecraft-datafolder on your host machine, so you don’t lose your world if the container is removed.restart: always: Keeps your server running.
Expanding the Proxy for Other Services
The beauty of this socat setup is that it’s not limited to just the main Minecraft port. You can use this exact same technique to securely proxy any other service, including other game servers or mods that require their own ports.
A great example is the Simple Voice Chat mod, which typically uses port 24454/udp. Let’s see how you would add that to our setup.
On the Cloud Proxy
You would modify your docker-compose.yml on the Oracle Cloud instance to add a new service for the voice chat proxy. You’ll also need to update your .env file to include the new secret UDP port.
Update your
.envfile: Add the secret ports for both TCP and UDP traffic.HOME_IP=<YOUR_HOME_IP> HOME_TCP_PORT=<YOUR_SECRET_TCP_PORT> HOME_UDP_PORT=<YOUR_SECRET_UDP_PORT>Update your
docker-compose.yml: Add thevoice-proxyservice and use the environment variables.version: '3.8' services: minecraft-proxy: image: alpine/socat:latest restart: unless-stopped ports: - '25565:25565' environment: - HOME_IP=${HOME_IP} - HOME_TCP_PORT=${HOME_TCP_PORT} command: > sh -c " echo 'Starting Minecraft TCP proxy to ${HOME_IP}:${HOME_TCP_PORT}'; socat TCP-LISTEN:25565,fork,reuseaddr TCP:${HOME_IP}:${HOME_TCP_PORT} " voice-proxy: image: alpine/socat:latest restart: unless-stopped ports: - '24454:24454/udp' environment: - HOME_IP=${HOME_IP} - HOME_UDP_PORT=${HOME_UDP_PORT} command: > sh -c " echo 'Starting Voice UDP proxy to ${HOME_IP}:${HOME_UDP_PORT}'; socat UDP-LISTEN:24454,fork,reuseaddr UDP:${HOME_IP}:${HOME_UDP_PORT} "
Key Changes:
- We’ve added a new service called
voice-proxy. - The
commandusesUDP-LISTENandUDPto specify the protocol. - The
portsmapping includes/udpto handle UDP traffic. - You’ll need to open port
24454/udpin your Oracle Cloud firewall and also apply theufw limit 24454/udprule if desired.
On the On-Premise Server
Similarly, you would update the configuration on your home server.
Create a
.envfile: If you don’t have one already for your on-premise server, create a.envfile and define your secret ports.SECRET_TCP_PORT=<YOUR_SECRET_TCP_PORT> SECRET_UDP_PORT=<YOUR_SECRET_UDP_PORT>Update your
docker-compose.yml: Modify thedocker-compose.ymlon your home server to expose the voice chat port and use the environment variables.version: '3.8' services: minecraft-server: image: itzg/minecraft-server ports: - '${SECRET_TCP_PORT}:25565' - '${SECRET_UDP_PORT}:24454/udp' # Add this line for voice chat environment: EULA: 'TRUE' volumes: - ./minecraft-data:/data restart: always
You would also need to add a new ufw rule on your on-premise server to allow the incoming UDP traffic from your cloud proxy:
sudo ufw allow from <ORACLE_CLOUD_IP> to any port <YOUR_SECRET_UDP_PORT> proto udpThis same logic applies to any other port and protocol you need.
Conclusion: Peace of Mind
And that’s it! Your friends can now connect to your Minecraft server using your Oracle Cloud IP address, and your home network is safely tucked away behind multiple layers of security.

This setup gives you:
- IP Anonymity: Your home IP is never exposed to players.
- DDoS Protection: The Oracle Cloud infrastructure can absorb basic attacks.
- Firewall Security: Multiple firewalls (Cloud, Router, and UFW) protect your server.
- Isolation: Docker containers keep the proxy and the game server neatly separated from your host system.
It might seem like a lot of steps, but the peace of mind you get is well worth it. Happy crafting!